使用SDM配置Cisco Easy VPN 教程 图文
XX公司,现在因为工作业务需求,需要搭建VPN,因为出差的用户比较多,而且又不同的客户,因为不同的客户和公司的业务关系也不一样。所以需要对于不同的用户,部署不同的VPN策略,在此给XX公司部署Easy VPN,比较节省成本。使用SDM(cisco安全设备管理,图形界面软件)来调试VPN
公司拓扑:

实验过程:
第一步 R1的预配置
复制代码
代码如下:
R1(config)#int e1/0
R1(config-if)#ip add 192.168.1.200 255.255.255.0
R1(config-if)#no sh
R1(config-if)#int f0/0
R1(config-if)#ip add 172.16.0.1 255.255.255.0
R1(config-if)#no sh
R1(config-if)#exit
R1(config)#
R1(config)#ip http server 启用http服务,用于SDM登陆
R1(config)#ip http authentication enable http认证采用enable密码来做认证
R1(config)#lin vty 0 4 进入VTY接口下
R1(config-line)#transport input ssh telnet 配置SSH和telnet
R1(config-line)#login local 登陆采用本地认证
R1(config-line)#end
第二步 在SDM中添加一个新的用户以便开启AAA

第三步 输入用户名和密码,将用户的权限设置为Level 15

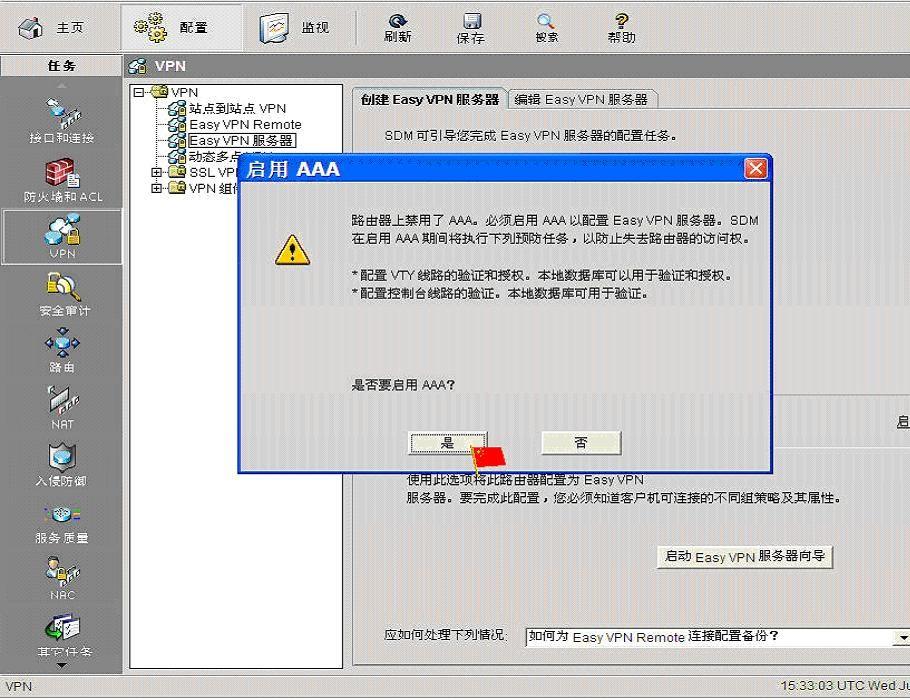
第四步 在SDM上开启AAA服务
第五步 开始SDM配置Easy VPN Server,在VPN→Easy VPN Server→启动Easy VPN服务向导

第六步 在Easy VPN Server服务向导中点击下一步

第七步 在接口和验证中选择接口为FashEthernet0/0,认证方式选择为预共享密钥

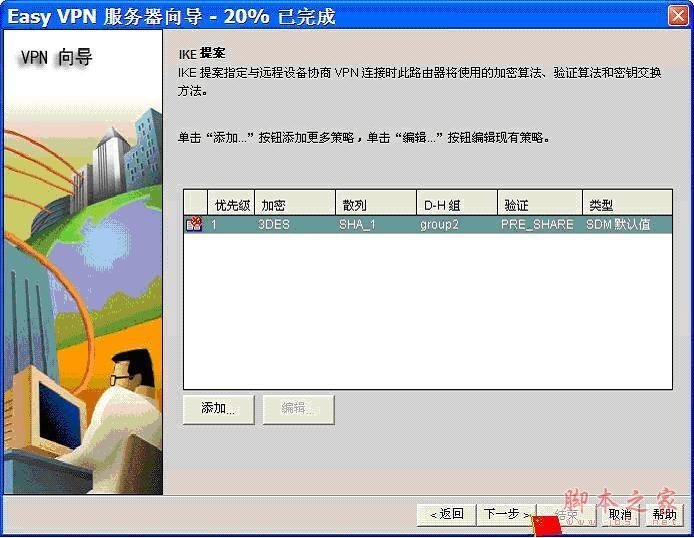
第八步 在IKE策略中选择默认
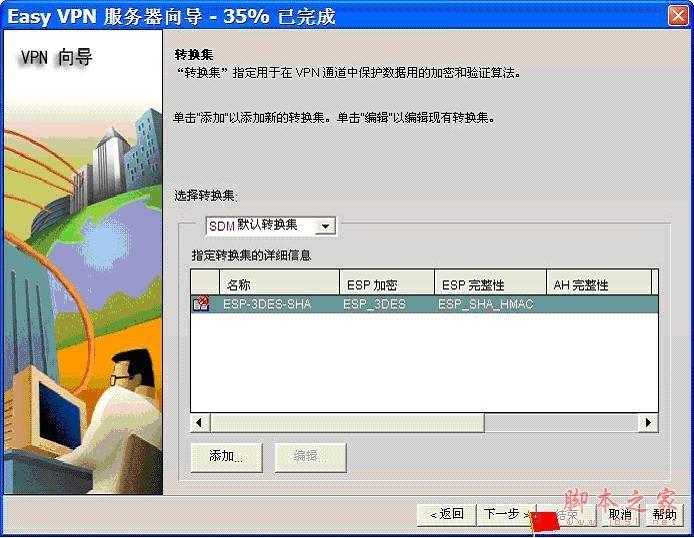
第九步 在转换集中选择默认
第十步 在组授权和组策略查找中选择本地

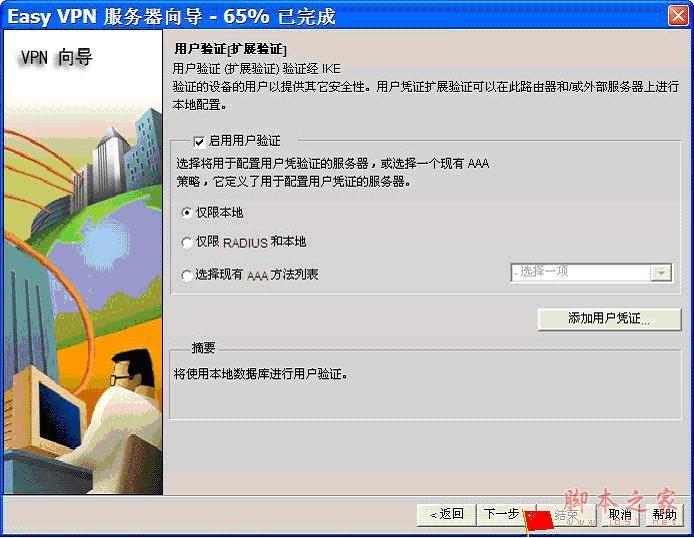
第十一步 在用户验证中选择仅限本地
第十二步 组授权和用户组策略中选择添加

第十三步 配置组策略

第十四步 确认无误后点结束

第十五步 查看shou run实际执行效果
复制代码
代码如下:
R1#show run
Building configuration...
Current configuration : 2094 bytes
!
upgrade fpd auto
version 12.4
service timestamps debug datetime msec
service timestamps log datetime msec
no service password-encryption
!
hostname R1
!
boot-start-marker
boot-end-marker
!
!
aaa new-model
!
!
aaa authentication login default local
aaa authentication login sdm_vpn_xauth_ml_1 local
aaa authorization exec default local
aaa authorization network sdm_vpn_group_ml_1 local
!
!
aaa session-id common
ip cef
!
!
no ip domain lookup
ip auth-proxy max-nodata-conns 3
ip admission max-nodata-conns 3
!
multilink bundle-name authenticated
!
!
username norvel privilege 15 secret 5 $1$EMdL$.RYjaI5OlA40s8rq0FsMJ/
archive
log config
hidekeys
!
!
crypto isakmp policy 1
encr 3des
authentication pre-share
group 2
!
crypto isakmp client configuration group sdmeasyvpn
key cisco
pool SDM_POOL_1
crypto isakmp profile sdm-ike-profile-1
match identity group sdmeasyvpn
client authentication list sdm_vpn_xauth_ml_1
isakmp authorization list sdm_vpn_group_ml_1
client configuration address respond
virtual-template 1
!
!
crypto ipsec transform-set ESP-3DES-SHA esp-3des esp-sha-hmac
!
crypto ipsec profile SDM_Profile1
set transform-set ESP-3DES-SHA
set isakmp-profile sdm-ike-profile-1
!
!
interface FastEthernet0/0
ip address 172.16.0.1 255.255.255.0
duplex half
!
interface Ethernet1/0
ip address 192.168.1.200 255.255.255.0
duplex half
!
interface Ethernet1/1
no ip address
shutdown
duplex half
!
interface Ethernet1/2
no ip address
shutdown
duplex half
!
interface Ethernet1/3
no ip address
shutdown
duplex half
!
interface Virtual-Template1 type tunnel
ip unnumbered FastEthernet0/0
tunnel mode ipsec ipv4
tunnel protection ipsec profile SDM_Profile1
!
ip local pool SDM_POOL_1 192.168.0.100 192.168.0.150
ip forward-protocol nd
ip http server
no ip http secure-server
!
!
!
logging alarm informational
!
!
control-plane
!
!
gatekeeper
shutdown
!
!
line con 0
exec-timeout 0 0
logging synchronous
stopbits 1
line aux 0
stopbits 1
line vty 0 4
transport input telnet ssh
!
!
end
第十六步 配置VPN Client

第十七步 点击VPN连接,连接后要求输入密码

第十八部 连接后状态

本文出自 “王万利的博客” 博客